Do you like the fonts on Teachers pay Teachers and the ones all over Pinterest?

Those fun Hello and KG fonts are really, well they are fun and eye catching.
For some of us they are getting old and tired. For those of you who like them those fonts can be found online and downloaded into your home computer with help of a youtube video and about 10 minutes. You cannot, however, download them on the your schools computer most likely. Sometimes a small change can grab the attention of the right student and just the right time and peak their interest.
I have your loophole right here. Cooltext. Here you will find 124 fun fonts that you can use. All you do is type your headline/ phrase etc. and copy and paste it into wherever you like

Some fonts even have motion to them. Go ahead and click on it.

Another site is Fontmeme Here are some of the fonts that Fontmeme can make.

https://www.gynzy.com/

Smartboards. I just want to use them to write on top of stuff I have made. I want to write on top of my Word Docs, my Powerpoints, my Prezi’s and anything I should find on the Internet that I feel like emphasizing. I can’t do most of that, or I couldn’t before www.gynzy.com. Smartboards just got smarter.

You can make notes and interactive lessons and all that fancy stuff you can do with SMARTNotebook, but gynzy has one feature that I want more than any other. THE GLASS PLATE.

The glass plate is a simple little button you almost have to be looking for to find it. It is on the BOARD tab, under the “+” and it allows you to write over anything on your screen. In addition, if you need access to links under the glass plate, you can toggle the Glass on and off so you can click through it at will. This requires a quick download to the machine, but once you do that you will get such great use out of your smartboard from now on.

Screen record in any app IOS 11

This is a great tool for the 21st century student who doesn’t seem to have patience for learning unless it is on their terms. Video instruction allows it to be on their terms. When they want it, how they want it and where they want it.

The 1st Graders can Code, but some 8th Graders Can’t Save a Document

This dilemma affects many districts across the nation. Just because we are focusing on coding and other problem solving activities in the early years does not mean we should forget about the basics of computer literacy. Too many times it is an either/or situation. I was talking to a student yesterday who told me that when she types a Word document and wants to save it she clicks on the “X” in the top right corner. She waits for Word to ask her if she wants to save it and says yes and just hits enter until the program closes. When she wants to open it again and continue with what she started she has no idea what to look for, what it is called or where to look for it.

We should all be using the Office 365 suite for ourselves and for our students. The video just above is something I sent out 3 times or so this school year to show the easiest way for students to save, share, and submit their work.
Office is what most of these students will be using in their future. It is not a situation of
Attempt
Attack and then unfortunately
Abandon
This is a skill that although it changes over the years, the basics stay the same. It is necessary, it needs to be repeated to the students every time they use it. Here is how to Save. Here is how to share. Here is how to turn it in.

OneNote and Thinglink Redux

One Note and Thinglink go together link Peanut Butter and Cupcake

It is so very simple to insert a Thinglink into a OneNote notebook.

1. Add a page where you want the Thinglink to appear.(or use an existing page)
2. Create your Thinglink, copy the link
3. in the notebook page, paste the link

BOOM! Thats all there is to it.

Schoology and Office 365

Schoology just got a lot easier to use to add assignments. Whether you use Google or Office 365, you should add the appropriate app and when you go to add an assignment there will be a new button to add a Onedrive or Google file. The list of your drive will open and you can attach a file, but you can also view the file to make sure you are adding the right one. Once you have added the file, you can watch sudents working in real time, see who has completed their work and make comments in real time as well.
The following video shows the Office 365 end of it.

OneNote + ThingLink

It’s always a good day when you find a fantastic new tool to use in your school classroom or business office. It’s an even better day when it plays well with the tools you’re already using. In this post you will learn how to easily combine the interactive tools of ThingLink and OneNote to add your interactive image, video, and 360°/VR creations to your notes.

Step 1: Create a ThingLink & find the URL
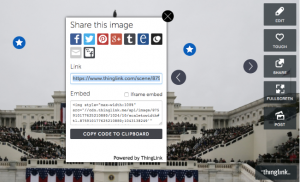
First, you’ll need a ThingLink image, video, or 360° image to add to your notes. Learn how to create any of these projects here, here, and here respectively. After your ThingLink is ready to to go, click on the share icon on your image. Copy the URL.

Step 2: Paste URL into OneNote
In OneNote, make sure you have opened up a page for taking notes. On the page, paste the link to your ThingLink creation. At first you will see just the URL. Press enter after pasting the URL, and the live ThingLink will appear.

That’s it! Combining these two tools is just a two step process, no embedding or coding required. Try using this appsmashing integration to enhance written notes with interactive 360°s, maps, and infographics.

Using Robots to Inspire Creativity

A director of technology shares how her school uses robot-based lessons to inspire collaboration and creativity among her youngest learners.

By Chani Lichtiger
11/09/2017

When you think of a typical first-grade student, do you think of them as mechanical engineers, technical analysists or data interpretation specialists? Do these titles sound far-fetched? At Yavneh Academy in Paramus, NJ, those titles exactly describe our youngest learners. We teach them the importance of collaboration, problem-solving through critical thinking, and that making mistakes is OK — all while introducing them to early coding and programing concepts.

It all starts with robotics-based lessons that support our STEM curriculum.

Students simulate animal migration using a light sensor and KIBO robot.

Teachers, Meet Robots
Three years ago, we were looking for ways to integrate robotics into lessons, with the goal of expanding the curriculum, while at the same time making it more engaging to our students. At a meeting of school leaders from around New York and New Jersey, I was introduced to KinderLab Robotics. The KIBO robot kit includes a buildable robot; programing blocks; three sensor modules (light, sound, and distance); a lightbulb; and an art stage. And KIBO allows kids to program and build their own robot with no screen time on PCs, tablets, or smartphones.

The next day at school I very quickly explained to our Head of School, Rabbi Jonathan Knapp, that incorporating the robotics curriculum would broaden our students’ minds through the use of imagination, step-planning, and asking questions. It would also teach them how to work with their peers to create a finished project.

problem solving with robotics

We moved forward with two days of training where all of our teachers learned how to use and integrate robotic instruction into their curriculum. We gave them time to play with and experiment with KIBO so that they were comfortable with the program and believed in it. Because teachers inspire their peers to get excited about new technology and approaches to education, we needed them to see the value in using robotics to instill more deeply the curriculum they were already teaching in the classroom.

How Robots Inspire Collaboration
When educators started using KIBO in class, they all had similar stories of students wanting to spend their lunch and recess times building, programming and decorating their own robot.

One such story comes from a class learning about Jerusalem Day in Israel. Each of the robots had to represent a different location in Israel. As a group, the first-grade class created a program that would transport each robot to an area in the school that was correlated to a location in Israel. The robots could spin or even dance on the way there!

The young learners also had to design an outfit and choose a song they wanted the robot to perform once it arrived at the destination. Lots of conversations went on in their groups to plan it all. They had to assess what may or may not work. It was a whole new way to communicate between kids. To show the progress of how the group arrived at a finished product, we had them take pictures on iPads. When the robot arrived at its destination, it became a success story for the group who designed it.

By having a firm vison of what we want our robots to do, and with careful planning and sequencing, events such as the Jerusalem Day can be a part of any classroom’s curriculum. The Jerusalem Day event didn’t “just happen,” though. Careful steps led to such a wonderful outcome:

First, our students played and experimented with robots that were already made, and then with the parts that went into the completed robot.
We put the students into groups of three. This coincided with our goal to improve collaboration skills, to teach students to look at another person’s view and evolve their own views from their original ideas.
As the collaboration and brain-storming grew, each of the students kept journals, so that any time they experienced something related to learning engineering, they could document what worked well, what was a problem, and what was a solution to the problem.
We work to incorporate the use of robots into every lesson possible. Another example comes from our science curriculum. Students were learning about animal migration and different habitats. We had students build habitats around the room (pictured below) and turn their KIBOs into different birds. Students had to program the robot to migrate to the proper habitat located across the room.

robotics animal habitats with kibo robots

On to Programming and Coding!
As students grow older and their coding skills evolve, we expand our use of KIBO and incorporate new tools including Kodable, Scratch, ScratchJr and resources from Code.org. To show our students the importance of coding, our entire school, including office staff and custodians, participate in our Week of Coding celebration.

Integrating robotics into the curriculum can be a beautiful and meaningful educational experience for students, and can prepare them for life after school. The world is changing so much. Experts suggest that 65 percent of children entering grade school this year will end up working in careers that haven’t even been invented yet. Since we don’t know what the world will be for future students, we need to prepare them for as much as we can.

I Do Not Understand Teachers pay Teachers

As teachers we have all experienced using money out of our own pocket to make purchases for our rooms, displays, bulletin boards, even our students. Why would we charge one another for anything. I am tempted to start “Teachers don’t need to pay one another because we all have gone through the same things and we should know what empathy is and we should be empathetic towards one another and not charge for ideas.”
That title seems a little long, but you get the idea. Maybe Teachers share with teachers would be nice.

Sharing only a part of YouTube video

by Tim Mangiaracina
October 16, 2017

I am a stubborn man. Last school year when I was presented with the problem of sharing a very small part of a very large youtube video I thought for sure there was some kind of online converter that would make it shorter as well. I brainstormed with a few people and came up empty.

But now it seems someone smarter than I am has taken my problem and solved it for me. As previously stated, most of my ideas were someone else’s first.

The solution is two steps, the first step is to take the URL of the video and place it in the first website. This site allows you to add a start time and end time for your sharable video clip. If we were not in the school, that would be all you need to do. Because the school’s network does not let us use shortened URLs we need a second step. Copy the link that the website generates and place it in the second site which is a URL extender. This will give you a link or URL which you can use in the school.

Sharing part of a YOUTUBE video with your class with a start time and end time

1. Find the youtube video you want the Ss to see a part of.
2. Write down the start and end times
3. Copy the link, paste in this site. http://www.youtubestartend.com/index.php#link
4. Click PREVIEW VIDEO
5. Add the start and end times, click Submit
6. The site gives you a shortened URL, which we cannot use in the school.
7. CLICK copy link and open a new tab with http://urlex.org/
8. Paste the link and click the EXPAND button.

9. The URL is the link you can ad to your lesson, onenote notebooks, schoology or however you want to share that part of a video clip.