They’re Not Paperweights

Redefining Student Growth with an iPad Program that Works

Half size ipadclassroomheader 1433262851

Small thumb nagler picture  1  1433281281 Michael Nagler, Ed.D
Jun 4, 2015


Simply buying iPads will not transform a classroom, as most educators know. But by understanding the devices’ capabilities and limitations, and learning from others’ efforts, teachers can introduce tablets to their students with expectations of meaningful impact. It has been four years since the Mineola Union Free School District implemented iPads 1:1 in two schools, helping us transform education by redefining the meaning of student growth. We have valuable experience to share, as we also continue to learn.

The Nuts and Bolts

Teachers can use iPads in the classroom in myriad ways. Using educational researcher Ruben Puentedura’s SAMR model as a framework, we have summarized some of the practices that we have found successful in our school district :

1) iPads compiement current instructional practices:

  • Students use educational apps without supervision.
  • Students use generic functionalities of the iPad, such as web browsing, to conduct research.

2) Students use iPads to complete existing tasks, with no functional change in the work they’re doing:

  • Instead of pen and paper, students annotate assignments using a touch screen.
  • Students turn in assignments digitally.
  • Teachers provide feedback on student work using a touch screen.

3) Students use iPads to complete existing tasks, with functional improvement in both the richness of the work and the feedback it receives:

  • Teachers record feedback on student work with annotations and voice.
  • Teachers record lessons for students to watch.
  • Students record audiovisual demonstrations for assignments.
  • Students create movies.

4) iPads allow teachers to significantly redesign assignments:

  • Students work on projects in teams.
  • Students provide feedback to each other.

5) iPads allow teachers to create new and previously inconceivable tasks:

  • Teachers grade student work using automatically generated Common Core rubrics.
  • Teachers group students by ability level in Common Core Standards allowing for data-driven instruction.
  • Teachers source relevant resources for individual students based on performance in formative assessments.
  • Teachers create their own library of original content, tagged and searchable by every educator at the school.

The SAMR model is just one way to ascertain a successful iPad implementation. But skepticism remains about whether tablets can truly increase student achievement. Thus any evaluation of an iPad program requires a careful examination of student work.

Using School4one’s workflow app, we have done just that. The creation of daily digital assignments provides teachers with an overwhelming amount of student material. Moreover, since student work is collected over time, growth is easily tracked. Imagine looking at an assignment in a specific standard in September and then comparing it against that student’s work in the same standard in June. Technology has allowed us to finally realize student portfolios in an easy, efficient and progressive manner.

See full size image

Key Steps to Success

Putting a dynamic iPad program in place involves many steps, as illustrated above. A thoughtful progression can make the difference between using iPads as paperweights or as key tools to successfully introduce new instructional methods.

Here is a list of our classroom-tested best practices for a successful iPad implementation:

  • Training: Teachers need to be trained in basic iPad features and the apps they will use to accomplish their goals.
  • Internet Speed: The school’s network needs to be able to handle multiple students downloading files at the same time.
  • Digital Resources: Teachers need to have access to digital resources to share with students. For example, we are building a curriculum using materials from publishers as well as those produced by teachers.
  • iPad Workflow: Teachers need a way to assign, collect and grade school work from students. Do NOT underestimate this step! A learning management system that was designed for the web only will limit what students can do with their iPads at school.
  • Standards and Learning Objectives: All student work is tagged according to school-wide standards, creating individual digital portfolios that students, parents and teachers may examine throughout the year. Educators can easily monitor student growth in each standard, and also determine the need for more advanced instruction such as differentiated learning.
  • Project Based Learning: This is a powerful addition to traditional curricula, allowing teachers to use iPads to easily deliver problem- or project-based lessons. iPads also enable students to collaborate with each other–the ultimate redefinition of student growth.

Turn YouTube into a Classroom with eduCanon

This is a truly great site to use and best of all, its free.

My Experience with eduCanon

I opened up an account to play around with the platform, using one of my own videos, and here’s what I can tell you: It’s easy, and it’s fun. In less than half an hour of watching a few tutorials and reading the information on the FAQ page, I got the hang of building a lesson. (Click here to view a sample lesson I created.) From that point on, it was a piece of cake. The whole time I was building my practice lesson, I kept thinking, This is so cool. And once I got past the learning stage, I started to realize all the possibilities this platform opens up. Everything on YouTube. Everything on Vimeo. So much we could all do with that!

Here are some of the best features of eduCanon:

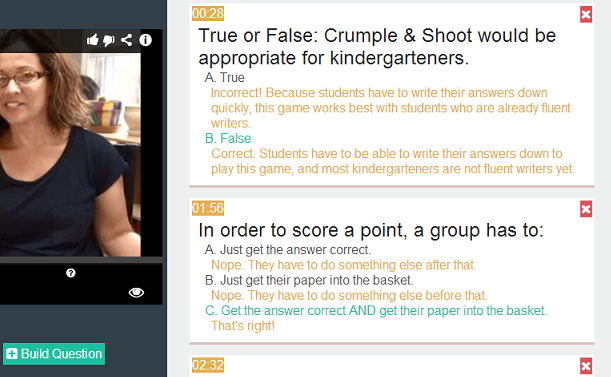
Embed questions at specific points. You decide exactly when a question will pop up during the video. Even better, students will not know when a question is coming. This means they really have to pay attention!

Teachers can monitor student results. When you sign up as a teacher, you create class lists, then assign lessons to these classes. As students complete a lesson, you are given a question-by-question breakdown of their responses (see sample below — green is correct, red is incorrect). This allows you to see in an instant which students are having trouble understanding and which concepts need re-teaching.

EduCanonBreakdown


More than simple multiple choice. When building questions, you have the option to add explanations that will pop up when students choose an answer. This means even getting an answer wrong is a learning opportunity. In my lesson builder below, you can see I entered explanatory text to appear for every answer. (By the way, these only pop up after students commit to an answer.)

EduCanonBuild02


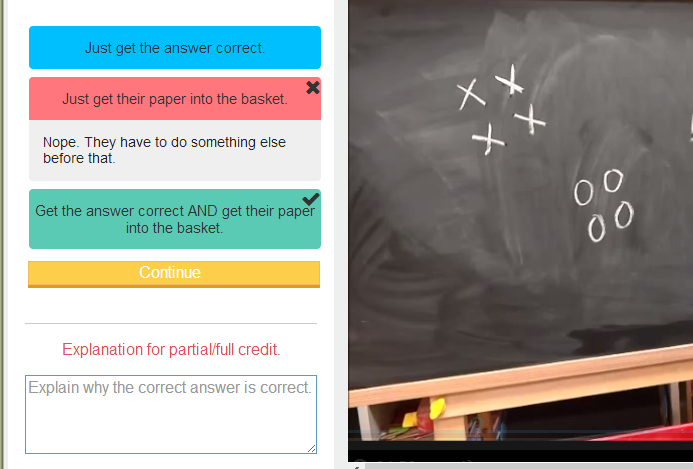
Robust re-takes. Students can re-do lessons, but eduCanon offers a way to make the process more than a simple guessing game. If a student guesses the correct answer the second time around, you can set it up so they are prompted to type in an explanation for why this is the correct answer.

EduCanonPartialCredit


Did I mention it’s free? The site developers are committed to keeping the essential features of the site free. They are working on a premium offering at an introductory rate of $40 per year which will include features like open-ended questions (the free account only allows multiple choice), gradebook download of student scores, and access to a library of lessons created by other teachers, but the basic platform will remain free.

Give it a try!

We’re fast approaching the time of year when anything new will be a breath of fresh air for you and your students, so this is a great time to try eduCanon on a small scale. My advice would be to choose a topic that you have coming up in a month or two, find a video that would support that unit, and experiment with building an eduCanon lesson around it. Maybe you’ve wanted to try flipping your classroom, but didn’t know where to start. This would be a great first step.


External Storage?

01-ibridge-boxed.jpgYou can buy the latest iPhone and iPad with 128GB of storage, but many get less due to the high cost. Those with just 16GB or 32GB can quickly find it filling up, especially when shooting lots of video. The iBridge from Leef may be the solution for those storage problems.

This little gadget plugs into the Lightning connector on the iPhone, iPad, or iPod and adds 16 – 256GB of storage. It supports transferring music, photos, videos, and documents between the iBridge and iOS devices.

The gadget has a unique curved shape that is designed to keep the iBridge out of the way as much as possible. It sticks out of the Lighting connector about an inch, and curves behind the iPhone or iPad. It has enough room to fit the iPhone in a typical case.

Latest review

Jorno folding keyboard for iOS, Android, and Windows: High-quality construction and design

The Jorno folding keyboard started with a Kickstarter campaign in 2012, and since has morphed into a capable design. It features a keyboard that folds into a very small package at quitting time.
Read More

The end of the iBridge that hides behind the iDevice has a full USB connector. This is used to plug the iBridge into a device with a USB port for putting content to bring over to the iOS device. Simply copy the files to the iBridge as you would with an SD card and then plug it into the iDevice for file transfer.

The iBridge requires an app on iOS to interact with the device. The first time you plug the iBridge into the iPhone it notifies you that you need the free app and takes you to the app store to get it.

The app has settings for dealing with the iBridge, plus a content viewer, a camera app, and a file transfer app all rolled up into the main app. The settings allow using the iBridge as a local photo backup and to set a storage limit on the iDevice which when hit, starts storing content on the iBridge when present.

The camera app is a basic way to take photos that are stored directly onto the iBridge.

The file transfer app provides quick access to transfer iPhone photos to the iBridge or to go the other way. There is also a file manager with tabbed access to storage on both the iPhone and iBridge.

Here is one for the parents

A Parent’s Guide to Online Education Resources

WP Greet Box icon

Hello there! If you are new here, you might want to subscribe to the RSS feed for updates on this topic.

Once upon a time, I was a brand spankin’ new, fresh-faced, wide-eyed homeschooling mom. You see, I never ever planned, let alone pictured myself in this role, EVER.  It’s just that unexpected life circumstances practically begged me to start homeschooling my children to create the kind of flexibility my kids and I needed to be able to visit my husband more often, who at that time traveled full time for work.

Who would have thought I’d still be homeschooling seven years later?!  In that time that I’ve been around the block and back — I’ve learned alot, but even more so, I’ve grown a desire to help others who have found themselves on their own journey to provide their children with the best education they can, whatever that may look like for their family.  So I put together a roundup of the types of free education resources I would have loved to have found compiled all in one spot, when I first began combing the ‘net for ideas with only a week to plan the material I would use to create curriculum for our homeschool.

Online Educational Resources 2

While each of these resources linked below would work well in most homeschools, most would also work well as a supplement to any traditional school curriculum.  This list is by no means all-inclusive or comprehensive – these are just some of our online favorites and the faves of some friends who I polled for ideas.  I do intend to add to this list over time, but as you can see, it is already lengthy so peruse at your leisure.  My suggestion would be this — Click through to the sites applicable to the current age group of your children, and bookmark and pin this post for later use.  Bonus points if you send it to your mom friends!  ;)

All Ages

Preschool and Elementary


Middle School

High School

Gifted Education

Facebook Groups for Parents

What would you add to this list of online resources for parents?  I’m always looking for new ideas and would love to hear YOUR favorites!  If you would like to learn more about how you get help navigating educational options for your child, click here to learn about our educational consulting and parent coaching  :)

50+ Best Websites for Teachers

Which ones are your favorites too?

Welcome! Join us for the upcoming Classroom Management Solutions live training event on Monday, March 23 at 9pm EST. It’s free! Click here to sign up.

These days there are so many websites and resources available to help teachers, but that doesn’t mean that teachers know what all’s available to them.

There’s so many lists of websites out there, but what makes this one unique is that these websites have been recommended by teachers themselves. Thank you to all the teachers who submitted your favorite website!

A disclaimer, though: I have not personally vetted these websites. I’ve simply compiled a list of websites that teachers love and recommend. I hope it will be helpful. And help make this list even better by adding your favorites in the comments!

Best websites for teachers

Websites that Provide Resources, Ideas, or Professional Help

 Great Websites for the Classroom and/or Students

  • Remind.com – a safe way for parents to text message students and stay in touch with parents
  •  Moby Max – integrated curriculum and teacher use system for ELA and math Common Core
  •  Discovery Education – provides high quality, dynamic, digital content to schools
  •  Read Theory – Sign up for free and gain access to over 1,000 reading comprehension exercises.
  •  Read  Works – reading comprehension
  •  FCRR – Florida Center for Reading Research
  •  GoNoodle – brain breaks kids love
  •  ABCya.com – free educational kids computer games
  •  Planbook.com – lesson planning made easy
  •  Free Rice – practice questions in a variety of subjects (and they donate rice to impoverished countries for each answer you get right. How cool is that!?)
  •  Flocabulary – educational hip-hop songs and videos
  •  Reading Rockets – help young children learn to read
  •  CNN Student News  – a ten-minute, commercial-free, daily news program designed for middle and high school classes.
  •  Grammar Bytes – grammar quizzes
  •  AR Book Finder
  •  Utah Education Network – K-2 student interactives & much more
  • Illuminations – resources for teaching math

 Awesome Blogs for Teachers

Is your favorite website not on the list? Add it in the comments below.

Great apps you want to use part 1

Tellagami

Level: Early elementary (K-2), Upper elementary (3-5), Middle school (6-8), High school (9-12)

Tellagami is a mobile app that lets you create and share a quick animated video called a Gami. To create a Gami, customize your character and background, then record or type a message for your character to say.

Tip: Students can customize their own avatar, upload images for backgrounds, and record their own voice to create their Gami. No account or login information required.

Telligami was used making the very first post on this blog, fyi

ipad tips and tricks 26-50

26. Hidden apostrophe key on the keyboard

This is a great tip for any app, such as Notes, Pages or Mail, that you type into using the iPad’s virtual keyboard. Rather than having to go to the second screen of the keyboard every time you want to type an apostrophe (which is a real pain) just tap and hold on the ! key and a hidden apostrophe option will appear – then just slide your finger up to access it.


Digsby
IM, Email, and Social Networks in one easy to use application!
http://kvors.com/click/?s=88377&c=89569&subid=21226

27. Quick quotes

You don’t have to move the iPad’s second keyboard screen to enter a quotation mark either. Simply tap and hold over the ? key and a quotation symbol appears, which you can select by moving your finger upwards.


28. Add a full stop

Another great keyboard tip for typing in apps such as Pages, Notes or Mail is to doubletap the space bar at the end of a sentence. This adds a full stop and a space for you, which can be enormously time-saving when you’re writing long articles.


29. Dim your iBooks

You can lower the brightness setting down to a low level using the Brightness option under Settings. But the iBooks app has its own brightness slider, which you can use to lower the level down more conveniently.


30. Change days

There’s no way to swipe to change between days in the Calendar app, but don’t forget the navigation bar along the bottom of the screen – this can be used to switch to different days (or weeks/months, depending on the view you’ve chosen). The current day is always shown in blue, or you can just tap the Today button to return to the current day.


31. Street View in Maps

The Maps app running Google’s Street View is one of the coolest features of the iPad, yet accessing it is so confusing few people even know it’s there. To access Street View you need to have dropped a red pin on the map (which happens when you do a search). You then tap the red and white icon of a person to enter Street View.


32. Directions in Maps

There’s no free sat nav for the iPad, but directions in Maps are a substitute if you’re walking, driving or taking the bus. Just tap Directions on the top left of Maps and the iPad even works out where you are right now, then takes you step-by-step through each stage of your journey. It will even suggest more than one route, so you can take or avoid motorways if you want, for example.


33. Display PDFs

There are two ways to display PDFs on your iPad: you can either email them to your iPad, in which case you get an Open in iBooks button appear, or you can sync PDFs from your Mac or PC via the Books tab in iTunes.

To do this just drag and drop the PDF into iTunes, then when you sync your iPad click on the Books tab and select the PDFs you’d like to sync. In iBooks you click on PDFs in your library to see the PDFs you have ready to display.


34. Camera focus and meter

In the Camera app, tap on your subject to both focus on and meter the light properly. In this shot, notice how the chair is dark and the boy outside is properly metered. You can reverse that by simply tapping on the chair.


35. Get a grip

You’ll probably hold the iPad by its sides, but it’ll rotate to put the shutter button at the bottom, making you wobble when you reach for it. So use the orientation lock to put the shutter where you can easily thumb it, then just rotate your images or videos afterward in an image editor.


36. Take charge in FaceTime

Once you’ve started a video call, you can move the picture-in-picture window that shows you by simply dragging it around with your finger.


37. Photo Booth fun

Sure, you’re great, but Photo Booth is even more fun if you point it at friends or family. Simply tap the ‘twirly camera’ icon in the bottom right. to use the camera on the back You can also snap stills by hitting the shutter button, but Photo Booth doesn’t do video.


38. Download photos straight from your camera to your iPad

You can’t plug an SD card from a digital camera straight into your iPad to view the photos, but you can purchase the iPad Camera Connection kit from Apple. With this device attached you can transfer photos straight from your camera’s memory card. Get it from the Apple Store online.

39. Quicker websites

Save time typing web addresses in Safari by using the iPad’s “.com” key when typing in a URL. A little-known timesaver is that if you hold down the .com key you get access to a menu that offers a .co.uk and other options too.


40. Quick Safari scroll

You can jump up to the top of any web site – indeed any list – by tapping on the top of the title window. It’s much faster than scrolling by hand.


41. Zoom in on websites

You can zoom in on any website by pinching out with two fingers on the screen. This also makes it easier to select words and tap links. To zoom out again, just pinch in with two fingers. Double-tap on any text or image to auto-zoom so it fills the screen.


42. Turn on Bookmarks bar in Safari

We all know you can tap the bookmarks icon in the Safari toolbar to access your bookmarks, but you can significantly cut down the number of taps it takes to get to them by turning on your Safari Bookmarks Bar permanently. In the Settings app, tap Safari, then turn Always Show Bookmarks Bar to ON.


43. Clear browsing history in Safari

Need to cover your tracks online? You can delete your Safari browser history in a flash. Just open the Settings app, then tap Safari and tap on Clear History. Note you can also wipe your Cookies and clear your Cache here too. There’s also a Private Browsing mode you can turn on, so your history won’t be tracked. Turn this on in Settings > Safari.


44. Open Safari links in a new tab

You can open links in a new Safari tab, rather than always opening them in the current one. Just tap and hold on the link and a pop-over menu appears giving you the option to open the link in a new tab.


45. Find text on a page

You can search for a particular word on an open page in Safari. Type your word into the Google search box. You’ll see a list of suggestions appear, and near the bottom you’ll see “On This Page”, showing how many times that word appears on the page. Tap the Find option to go to the first instance of the word.


46. Turn off iPad email alert chimes

You can turn off the chime for new emails. Go to Settings, then General, then Sounds and turn off the New Mail sound. You can also adjust sound levels here.


47. Preview more of your emails

The iPad’s Mail app defaults to previewing two lines of each email before you tap on it. Sometimes however it would be handier to be able to see more of an email before loading the whole thing in, especially if you are on a slow connection. To do this open the Settings app, then tap on Mail, Contacts, Calendars and change the Preview options to add more lines.


48. Turn off iPad push mail

Most mail accounts default to Push as a delivery mechanism, if available. This automatically ‘pushes’ any new emails your way as soon as they are available. If you find this annoying or distracting you can set your Mail accounts to check for new messages at intervals, or manually so they only check for new messages when you tap the Refresh button. To turn off Push, select the Settings app and Mail, Contacts, Calendars and choose Fetch New Data, then turn Push on or off

49. Make an iPad backup

If you want to make sure your iPad’s data is properly backed up then you can force iTunes to back it up. When you’re conencted to your Mac or PC, open up iTunes and right-click on your iPad in the Devices list and select Back up. However, you can also use iCloud to back up. Turn this on in Settings > iCloud. When you do so, your iPad will stop automatically backing up to your PC.


50. iPad is flat and won’t charge

If your iPad battery is completely flat then it can take a while for the red battery symbol to appear when you plug it in to charge, indicating that it is charging. Don’t panic, just leave it plugged in and wait – the charging symbol will appear eventually.


50 iPad tips and tricks, 1-25

50 really useful iPad tips and tricks
By Matthew Bolton May 09, 2012Tablets

50 IPAD AND IPAD
With great new features like two video cameras, a faster processor and a Retina display, the new iPad is the world’s best tablet device.

iPad 2 review
New iPad review
It’s also fully capable of running the latest version of Apple’s iOS operating system and great apps like iMovie and GarageBand.

Here we present 50 really useful iPad tips. We cover everything from customising your Home screen through to getting more from built-in apps like Mail and Safari.

10 best tablet PCs in the world today
The vast majority of these tips will also work on the original iPad and iPad 2, so owners of any generation of iPad shouldn’t feel neglected.

For 50 more iPad tips, check out a new iPad app called 100 Tricks & Tips for iPad 2, brought to you by our colleagues on MacFormat.

1. Create folders

iOS now supports folders. To create a folder all you need to do is tap and hold on an app until they all start to jiggle, then drag the app over another icon and release.

Your iPad will create a folder with both the apps in. The folder will be named according to the category of the apps it contains, but you can rename it as you like.

2. Access all running apps

Double-clicking the Home button shows you all the apps that are running on your iPad in a bar along the bottom of the screen. To switch to a running app just tap on it here in this bar. Just swipe the screen downwards to remove this bar.

iPad 2 running apps
3. Orientation Lock or Mute?

The internet got mightily upset when Orientation Lock was replaced with Mute on the iPad during the last iOS update. Apple listened, and now you can head to Settings > General to choose between Lock Rotation and Mute.

iPad 2 orientation
4. Passcode Denied… DELETE ALL!

If you’re carrying around sensitive data, you can now enable a feature that’ll erase all the data on the device if someone inputs the incorrect passcode 10 times. Navigate to Settings > General > Passcode Lock > Erase Data.

iPad 2 passcode
5. Home Sharing

First, turn on Home Sharing in iTunes (Advanced menu) and on your iPad (Settings > Music/Video and enter your Apple ID). Next, launch the Music or Video app on your iPad. In the Music app, tap the “More” button at the bottom, find the little house with “Shared” next to it. Tap on that and then on one of the Shared Libraries. It might take a few seconds to update, but then you can listen to all of that Library’s media on your iPad. For video, tap the Shared tab at the top of the screen.

Really useful iPad tips
6. Control iPad notifications

By going to Settings > Notifications, you can decide which apps can pop up alerts, which have notifications at the top of the screen, and which appear in Notification Center. This means you can make sure that noisy apps don’t clog things up for you, and you notice the important things.

Really useful iPad tips
7. Go VPN

The iPad supports a VPN connection. To configure it, go to Settings, then General > Network. Select the VPN and move the slider to On, then add a VPN configuration with your server and account details.

iPad 2 vpn
8. Stop asking to join Wi-Fi networks

If you’re fed up of getting bugged by messages asking if you’d like to join this or that Wi- Fi network all the time then head to Settings, Wi-Fi and turn off Ask to Join Networks. You can still join any network that will have you from this same screen, it just won’t bug you constantly when the opportunity arises.

iPad 2 wifi
9. Turn battery percentage off

Do you find the battery charge percentage distracting? The good news is you can turn it off very easily. Go to Settings, General, Usage and you can turn it off here.

iPad 2 battery percentage
10. Quick volume mute

When the iPad first launched, there was no dedicated mute button anywhere on the device. However, with iOS 4.3 Apple has given you the choice of using the lock switch to mute the sound or lock the iPad’s orientation. Either way, a good tip for quickly muting your iPad is to press and hold the Volume-down button.

iPad 2 volume mute
11. Use an Apple keyboard

Missing a real keyboard? Any Apple Wireless Keyboard will work with the iPad. In fact, your iPad will work with any Bluetooth keyboard. Some iPad cases have a keyboard built in, which can be handy.

12. Connect to an HD TV

You can connect the iPad 2 and new iPad to your HD television using Apple’s Digital AV Adapter (which connects from your 30-pin Dock adaptor to a HDMI port) or a plain old Apple VGA Adaptor. Both are available from the Apple Store. The iPad 2 and new iPad support video mirroring, so your entire Home screen will appear on the TV, not just the videos you play.

Connect ipad 2 to hdtv
13. AirPlay: Stream movies, photos and music

Whenever you see the AirPlay icon on your iPad it means you can stream whatever media you’re viewing to your Apple TV, which is usually connected to your living room TV. All you need to do is tap the AirPlay icon (which looks like a rectangle with a triangle in it) and it starts playing automatically – it’s so simple!

Stream ipad 2
14. Take an iPad screenshot

You can take a screenshot on your iPad by pressing Home and then the Sleep/Wake button. The screen will flash and you’ll hear a click, indicating that a photo has been taken. Your screen shots are saved automatically in your Photos gallery. Here, you can view or email them as you see fit.

15. Avoid underpowered USB docks

The iPad does not charge when you connect it to some USB docks or even certain ports on some notebooks. Instead, plug in to a high power USB port (check you computer’s specs, or use a powered USB dock). On some PCs, USB ports on the front of the computer are lower power, so you will need to plug into one on the back.

16. Use Multitasking Gestures

Multitasking Gestures, which utilise four and five finger gestures to let you switch between apps, to bring up the multitasking bar, and to close an app and go back to the Home screen. You can turn them on in Settings > General, but be warned that they clash with some apps.

iPad 2 multitasking gestures
17. Restrict your Spotlight searches

Swipe left on the Home screen to reveal the Spotlight search. By default it searches everything including songs in your iPod, podcasts, apps and events. To restrict the areas it searches, since you may not want all these categories included, look in Settings > General > Spotlight Search.

iPAd 2 spotlight searches
18. Add a Google Calendar

Want to add your Google Calendar to the iPad’s Calendar app? No problem. In Settings open Mail, Contacts, Calendars. Add an account and tap on Other. Tap on Add CalDAV Account and enter your Google Account credentials (the Server is www.google.com). Exit the Settings app and tap on the Calendar app and all your events should appear. By default all calendars are displayed, but you can tap on the Calendars button to choose which ones are shown.

iPad 2 google calendar
19. Find My iPhone (or iPad)

Apple’s Find My iPad works for all iCloud users. In Settings > iCloud, enter your Apple ID and then turn Find My iPad on near the bottom of the screen. Now if you lose your iPad, you can go to icloud.com or use Find My iPhone on another device to locate the iPad. If you have a Wi-Fi-only model, it will need to be connected to a Wi-Fi network for this to work.

Find my iphone
20. Use AirPrint

Thanks to AirPrint you can print right from your iPad, provided you’ve got a compatible printer, of course. If you’ve got an AirPrint ready printer then you just choose Print from the Share menu for virtually any open document. AirPrint works with the new range of printers from HP, and you can use a Mac app called Printopia (www.ecamm.com) to print to any printer connected to a Mac.

AirPrint
21. Use a Smart Cover

Apple’s iPad Smart Cover (from £35/$39) is a must have iPad accessory – it’s not just a dumb cover. When you draw it over the iPad’s screen it puts it to sleep for you, and wakes it up when you open it. Also, it latches onto special magnets built into the side of the iPad 2 and new iPad, so it’s a perfect fit. It doesn’t work with the original iPad.

Smart cover
22. Share from Pages

Transferring Pages documents from your iPad by syncing with iTunes on your Mac or PC is a real hassle. It’s much quicker to use the Share menu to email the finished document to wherever you need it to be. Also, you can email it as a Word or PDF document if you like.

Share from pages
23. Turn iPad caps lock on

To type a capital letter on the onscreen keyboard you first tap the left or right shift key, then the letter. If you need to type a whole word in caps this can be painful. Save time typing in caps by turning the caps lock on. To do this double tap on either shift key.

iPad caps lock
24. Copy and paste

You can quickly copy and paste text by tapping and holding down, and then choosing Select to select the exact portion of text you’d like the copy. Next tap Copy, then go to a different app, and tap and hold down again, then tap Paste from the menu that appears. Top tip: To select an entire paragraph of text you need to tap four times.

iPad 2 copy paste
25. Replace a word

When you hold down on a word to copy it, choose Select, then you will see a new option: Replace. Tap this and, you can see suggestions for alternative words that have similar spellings. It’s a good way of quickly correcting typos.

iPad 2 replace word

Skip to toolbar